Download
There are a few ways you can obtain phpvms and its dependencies. The full
package method already includes the vendor directory and you don't need to do
anything but upload it.
How to Download
Downloading Full Package
The zip/tar file from the downloads site contains all of the dependencies. Source code is not suitable for a fresh installation.
Cloning the Repository
If you chose to instead clone it from Github, rather than download it from above, you can do the following:
git clone https://github.com/nabeelio/phpvms.git
cd phpvms
npm install
npm run build
composer install
After running composer install, you can continue the installation instructions
See below if you are using a shared host; otherwise, skip to the next section.
Uploading Files On Shared Hosting
When uploading the files, you have several options on how to. These mainly apply
to shared hosts. For your own server or if you have control over the vhost
files, upload/extract the files to your desired location and point the vhost to
the /public folder.
If you are uploading to a shared host or to cPanel, chose one of the following methods when uploading your files.
Option 1: Creating a Subdomain
Creating a subdomain is the easiest and more recommended method, especially for
shared hosting. This works well if you have a landing or promo page on your
site's main domain, and then a subdomain like crew.yourva.com or something
similar.
Upload phpvms to a directory with the name of your subdomain, for example,
demo.vmshost.io. It should be parallel to the public_html folder (as above).
In this example, I want to create the subdomain demo.vmshost.io.
First, create a folder to extract phpvms into:
/home/youruser
  demo.vmshost.io < Extract phpvms files into here
  public_ftp
  public_html
Next, extract the phpvms files into this folder, so it looks something like:
/home/youruser
  /demo.vmshost.io
    /app
    /config
    /public
    ...
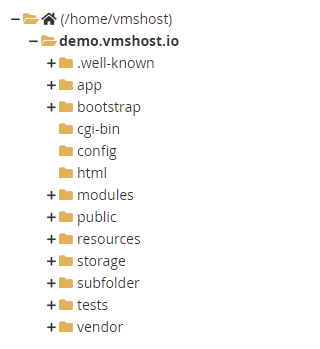
Next, create a subdomain cPanel, go to "Subdomains", and create the subdomain.
For the "Document Root", enter the path above, with the public folder -
demo.vmshost.io/public. Usually, cPanel will autocomplete the path to be the
subdomain - so just add /public to the end of it.
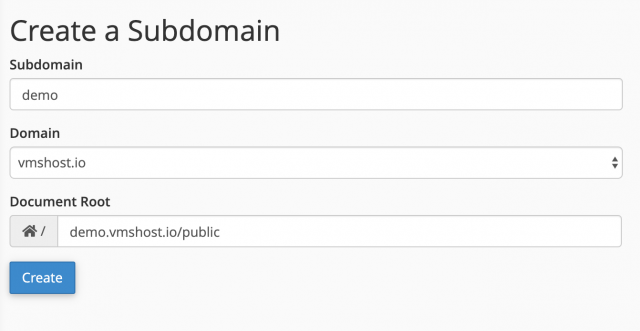
It will look like this:

Option 2: Copying the public directory
Uploading and change the path of the public directory is the recommended method if you're on shared hosting
This method works well if your main site is going to be phpvms.
- Download/upload phpvms into a
phpvmsfolder in your home folder. It should look something like: - Copy the files from the
/publicfolder into thepublic_htmlfolder.
/home/youruser
    phpvms      < Create this folder and upload phpvms into it
    public_ftp
    public_html < Upload the files from phpvms/public into
As long as you named the folder phpvms, the index.php will autodetect the
location of the phpvms folder.
Updates/auto-updates won't update the files in the /public_html folder, you'll
need to update them manually. The other method, the symlink method, is
recommended if you have command-line access and are more comfortable creating
those types of links.
Option 3: Symlink
This is an advanced method and not recommended to use on shared hosts, only do this if you know what you're doing
This method works well if your main site is going to be phpvms, and you're not running something like Wordpress. Running phpvms in a subdirectory isn't recommended (see method 2 instead).
Download/upload phpvms into a phpvms folder in your home folder. It should
look something like:
/home/youruser
    phpvms
    public_ftp
    public_html
To make this work properly and be secure, we're going to change the
public_html directory to point into the phpvms public directory. Then you can
upload files as usual, but phpvms will be the primary entry point. When you
create folder/files in the public_html directory, they'll actually get created
into the phpvms/public folder.
SSH into your server, symlink the public_html folder to point to
phpvms/public instead:
mv public_html public_html_backup
ln -s phpvms/public/ public_html
Option 4: Direct Upload (Not Recommended!)
This method isn't recommended, it could expose some sensitive directories if it isn't setup correctly.
This method isn't recommended because it can potentially expose your install if
the .htaccess or something isn't correctly configured. Upload the files
directly into the public_html folder, and make sure the .htaccess file is
active (check with your webhost). This uses the public folder directly.